My Christmas tree had burlap wrapped around the base instead of a tree skirt. ($15 for several yards, as opposed to $80+ for the tree skirt at Ballards... who cares that it looked like a Linus Blanket tree skirt.) It is so hard to see from this photo, but I also cut burlap into 6" sections and wrapped it around the tree instead of garland or ribbon. (Excuse the photo... this was taken long before I realized I'd want to include the photo on a blog! In fact, this was before we filled that huge hole above the fireplace with a TV... sorry for exposing our barenaked cables!)
So, I've been intrigued by any burlap projects out there. Anything that looks natural, yet pulled-together... and best of all, requires no sewing! When I saw all the burlap wreaths out on the blogosphere, I knew I'd have to do one.
Here are a few of my favorites.
This one came from Tatertots and Jello... SO colorful and cheerful. I love the little clothespin line to change out letters. Mini clothespins are AWESOME! (I use clothespins for my chip bags and cereal bag-inserts, for my preschool class for funky graphs, for my mitten Advent calendar, and so much more...)
This is from Where the Heart Is I love the ruffly look of the burlap, and who doesn't adore gingham ribbon?
This is from WhipperBerry. Gotta admit it... this is the blog that sold me on making my own. As you'll see below, I did something quite similar. Beautiful red color! I had no idea you could get burlap in such gorgeous colors till I saw this!
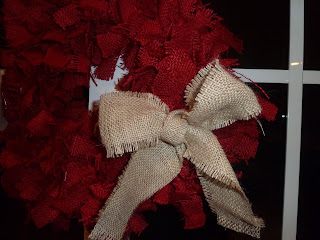
Well, when it came time for doing my own, I wasn't sure what I was planning. I wanted a red wreath, like the one from WhipperBerry, but I wasn't game on cutting lots of circles (I may be ambitious, but there's definitely an element of LAZY to me, too.) I simply used what I had easily on hand that night. This is what I ended up with.
Needs:
A wire-ring wreath form (the kind you get in the floral section with four rings, connected)
Red burlap (cut into 1"x8", approximately)
Natural burlap
Steps:
1. Never once did I measure anything. I simply cut strips that looked "about right". Maybe 3/4"-1" wide and about 8"-10" long. You will need a lot, but just keep cutting throughout the project till you think it's filled up.
2. Wrap each piece around one wire. I tried to do a shortcut and wrap around two rings at once, but it required longer strips, and didn't look as full. So, I tied knots around single rings.
3. Keep tying pieces onto the wire rings till the wire is completely covered. Doing it this way will result in shedding and some stray pieces. I think it adds to the charm. If you look closely, you'll see some strands sticking out all around.
4. Cut out any shapes you'd like to attach. On mine, I cut out a long strip of natural burlap and made a bow with it, and then I cut out a heart.
5. Attach the pieces with safety pins (to be easily removed later if I want to use this for Fourth of July or Christmas).
Wah-lah!
My problem was deciding where to put it....
On the hearth?
On the armoire?
On the side table?
On the mantle?
It wound up staying on the mantle. It gives a little personality to the mantle (which is sometimes overshadowed by the TV above). Nice and bright addition.
Yay! Ready for Valentine's Day!


No comments:
Post a Comment
Please leave a message... I would love to hear from you!
Note: Only a member of this blog may post a comment.