Monday, December 19, 2011

Another Pinterest Craft... a Ruffled Tree Skirt

The No-Sew Ruffled Tree Skirt circulated all over Pinterest this month.  So beautiful!!  And so darn easy!!!

I knew I needed it.  Here's the original from HGTV

I don't sew.  

So, if I can do this, you can do this!

First you take a painter's cloth.  I think I used 4x5'.  I folded it half, then in half, then in half to make a triangle/wedge.   At that point, I used a length of string to draw an arc and cut the tarp to make a circle.  I cut a small hole in the middle and a slash down one radius.  Then I found cheap muslin at Hobby Lobby.

I cut the muslin into 2-3" strips.  Then the tedious, but easy, part came. 

You gather the muslin and secure with hot glue till you have all the cloth covered with ruffles.  


So beautiful!

Under the tree.

Under the tree.


Our new tree skirt.  It took about 2 hours to fully complete, but it was SO worth it!!!

Sunday, December 18, 2011

My Pinterest Project... Pinecone "Wreath"


I found this on Pinterest awhile back and swore I needed to make it. 
{It was originally posted here.}

 I did... and before Thanksgiving, but it seemed appropriate to wait till December to talk about it. 


I made long ribbons with a bow tied at the end.  


Then I glued the bow to the flat end of the pinecones.  The pinecones were purchased at Joann's and were cinnamon scented.  I then collected all of the ribbons at the top and cinched them into a knot.  I tied a ribbon to the top to finish it up.

The final result:
It currently hangs on our powder room door (which is in the butler's pantry area).  It's great when you swing the door, you catch a strong scent of cinnamon.  Not a bad thing near the bathroom, I suppose.  :)


Saturday, December 17, 2011

Laundry Room Finished!

We've been in the new house for a little over a year now, and we still have about half of the rooms to paint.  Somehow, though, the big rooms seem daunting... too expensive.  :)

So, I'm sticking with small rooms for now.  

Like... the laundry room.  It was a simple room with a washer/dryer and a wire-shelf over both.  I wanted to make the most of the space, so we did a little altering.

Last month, we painted the walls a pretty aqua color and hung a ReStore-find cabinet over the washing machine.  (Word to the wise... don't try to hang a heavy cabinet OVER a positioned washing machine without removing shelves/doors to make it lighter.  We eventually figured that out.)

I tried to be self-sufficient and have Home Depot cut MDF shelves for me.  However, this was the perfect example of why we MEASURE twice, CUT once.  :)  I messed up the measurements by about 1/4".  Just enough that my sawing skills at home weren't good enough to fix the problem.

Enter...  my Daddy!  He came down at Thanksgiving and helped get the shelves up in the laundry room.  :)

The shelves were painted white to match the cabinet.  

Then came time to DECORATE!

I found three brown baskets for the shelves, but they needed labels.  

I used these 6" rulers, which were on sale at Michael's.  

I simply turned them over, and added some Cricut words.  

I then found some empty plastic jars in my "recycle stash".  

I removed the lid, wrapped the jar in fancy paper, and hot-glued twine to the top to dress it up.  
I made two of these:  one for lint/trash and one for "found items" in the machines (coins, etc.)  They won't be heavily used and bounced around, so the paper should hold up quite awhile.

I repainted my mini crate a brown color to go well with the brown sign, wood table, and brown baskets.  (It was a dark silver to match the machines.)

 The Shaklee bottles fit perfectly in the crate, and they are perfectly reach-able for any young'uns who complain that their favorite tee/jeans are dirty!  :)  Love that!!!

I dressed up the shelves a little with some vinyl lace edging (bought on Amazon).  Despite being sticky, it just didn't want to stick to the wood, so I finally got fed up and stapled them on!  LOL

The top basket is for miscellaneous things as time goes on (cleaners?  special towels?)  Thus, why I simply labeled it "miscellaneous", so I can use it for whatever I want in the future!  I originally though the top shelf would be perfect for the dryer shelf (the plastic shelf for shoes), but it was WAY too deep.  So, I simply tossed it behind the machines for now.  I almost never use it.

The bottom two baskets have the plastic jars in them... one on the left holds cut-up dryer sheets and a spray bottle with doTerra lemon essential oil and water.  That's my "hmmm, this load isn't smelling fresh enough magic-scenter for the dryer sheets".  The one on the right holds the trash jar and and the miscellaneous jar. 

Here's the completed room.  The little table to the right used to be a nightstand in the guest room.  It now holds things like extra tissue boxes and cleaners for the upstairs rooms.  The two wreaths are secured on the inside of the doors.  They were leftovers from the last house.  So I put them to use.

I found the Laundry sign at Hobby Lobby for 40% off.  The colors seemed to work well.

I am not a fancy "washer".  I simply throw the clothes in and hope for the best most of the time.  We don't wear hand-wash clothes and super delicates, so this laundry room holds most everything we need.  :)

Hope you enjoyed it!  Now... I need a new project... hmmmmm

Maybe I've exhausted the small rooms.  Time for the Master Bedroom?

Friday, December 16, 2011

Magnetic Picture Frames (EASY GIFTS!!)

Ever want to change photos easily without having to remove the back of a frame?  Here's a quick little project that would make for a great gift!

You'll need these things:

Galvanized flashing (I got the 10' roll, so I can make MANY magnetic projects now!)
Frames (any size, mine were 50% off at Hobby Lobby)
Fabric remnants
Spray Adhesive

Here's the flashing label, in case you are curious....

You'll need to cut the flashing.  It's do-able with sharp scissors, but needs care.  The metal edges can be sharp!

I ended up with two of these.  Ouch!

After cutting the size of the flashing to fit the frame (8"x10" here), cut a piece of fabric to fit the steel and an extra inch to wrap around the edges.

Spray adhesive on one side of the flashing, wrap the fabric around the edges (spray that area, too).

Fit into the frame.  
I actually put the glass behind the metal in case I ever wished to use the frame as a normal frame in the future.


 I then found some pretty rocks (found in bags in the floral section) to create a magnet.  I super-glued a strong button magnet to the back.  Any sort of magnet should work though.

Wah-Lah!  Small magnetic boards!

 Great for displaying this year's Christmas photo!

They should make some pretty gifts!  You can even tailor the fabric and type of frame to fit your decor.  I was aiming for "pretty yet classy"

Submitted to:

Wednesday, November 30, 2011

Christmas Tradition #2: 24 Days of Christmas Books

When my oldest kids were little, we started a new tradition.  Before December begins, Mommy and Daddy wrap 24 Christmas Books.  Every night of December, we allow one kid to open a package and either a parent or an older child reads the story to the family as we all sit around the Christmas tree, before bed.  

It's such a sweet tradition... we may still do this when the kids are older.  Every year I try to buy a new "surprise" book.  But most are books that the kids have heard already.  And as time goes along, I start weeding out the books that no longer appeal to the kids.  For example, the Wiggles Christmas went on Freecycle this year.  Ha ha!

I try to keep the books partly Christian and partly secular (Santa, reindeer, etc.)  That's our choice.  Then on December 24th or the morning of Christmas, we'll often read the story of Christ's birth in the Bible.

With four kids, how do we pick WHO gets to open the book (and pull out the goodies from the Advent Calendar)?  Same way we choose who gets to say the prayer at dinner each night.  

We have "person of the day"... our oldest gets days 1, 5, 9, 13, 17, 21, 25, 29.  Second oldest gets days 2, 6, etc.  And so on and so on.

Sorta reminds me of my preschool class and the  Special Buddy of the day... only we don't do Show-And-Tell at home.


Christmas Tradition #1: Mitten Advent Calendar

Prepping for the Christmas decorating starts weeks ahead of time.  Why?  
We need to be ready for the Advent Calendar.

This is our Advent Calendar:
Mittens!

At our last house, we had a free wall that I could string these across.
 At this house, our wall space is very limited... and all taken.  So, we went with this approach... two sections.  It needs to be high enough that the kids can reach... and hopefully not easy enough for the dog to eat.  Still waiting to see how many I lose this year with "crazy dog" in the house now.

I bought these mittens from a lady on eBay about 7 years ago.  They are all hand knitted by her.  She offered them at a little over $2 per pair!  I spent $40 on all 24 mittens.  I think I wiped out her store that day.  See the picture at the top?  Notice three red mittens in a row and one striped?  That came from me not planning well.  A few of this lady's auctions listed "3 mittens" in case your child lost one.  I figured that was an easier, cheaper way to shop... but wasn't thinking that I'd want to hang them in pairs. Duh.  Oh well.  Live and learn.  I've since seeing lots of mittens in the dollar section of Target.

I found little metal stars that I wired onto each mitten to represent the days in December.  I attach the mittens to twine with small (craft-section) clothespins, but larger ones would've been fine.


The fun, but never-ending, part is finding goodies to go inside.  Currently they are not all full... still need to find some clever goodies.  

In the past, I've used:
Certificates for a "surprise package" that I pull out for them to open (DVDs, CDs, etc.)
Candy Canes
Christmas Pencils
Christmas Erasers
Chocolate Coins
Mini Chocolate Bars
Ornaments
Cards (as in Pokemon, Webkins, trend-of-the-week)
 Mini craft kits
Oriental Trading toys

Any other ideas out there?  Still have a few to fill.


Tuesday, November 29, 2011

Thanksgiving with the Whole Family!

It's been forever since I've blogged ...again... I blog in spurts, but I love it so don't forget me.

For the last week or so, I was in Thanksgiving mode.  Cleaning the house, buying the food, prepping the food, entertaining, etc.  We had a great dinner at our home, hosting my parents, my sister and brother-in-law, Mike's parents, and Mike's aunt and uncle...14 in all.  Even with all of our siblings (uh, one), this is the entirety of our family.  Small family... that's okay, Mike and I had four kids to help it grow!  Love big families... maybe in another 20 years, we'll have a really BIG Thanksgiving dinner that needs all three of our folding tables? :)  My daughter declared at the table at Thanksgiving that she wants five kids... so she's helping my dream.  (Of course, she's six... I hope she means in another 20 years.)


Thanksgiving was great... loving the new home and new kitchen.  Dinner preparation went so smoothly.  The most stressful part was just getting the food to the table... all hot.  Do you find that too?  But we made it.  I tried a new mashed-sweet-potato casserole with pecans and coconut... yum!  It's like dessert.


Before Thanksgiving, we had another little incident....
Yep!  I hope she's learned her lesson.  No more jumping from eight stairs up.  Even IF there was a beanbag chair at the bottom to "break" your fall.  At least it's a very minor fracture, and the boot (not pictured) will be off in just 2.5 weeks.  (9 more days to go!)

Ha!  Just now realized she posed next to poor Lucy in her crate.  I think we were heading out the door to go to the Ortho doctor when I took this.  This splint was the ER's temporary fix.  Now she's wearing a knee-high boot, so she can walk.  Whew... she may be skinny, but it's a heavy, bony skinny.  Let's just say that two days of carrying her around resulted in a chiropractor's appointment.

The day after Thanksgiving, I did what everyone does... went to see Breaking Dawn.  Okay, maybe not everyone.  Actually I was probably the last one to see it... missed that midnight showing a few weeks back.  LOL

We tried shopping at midnight on Friday morning.  What a bust!  Walked in... saw the line already wrapped around the stores... and walked out.  My sister and I were home at 1:25 and in bed... with no purchases.  Husbands were happy.

The next day, Saturday, began Christmas at our house.


Tuesday, November 8, 2011

A Thanksgiving Tree

I've seen this idea around on blogland and thought I'd try my hand at it.  Here are some I saw online.


If you go to Pinterest and type in "blessing tree", you'll find loads of ideas.  Here's my take:


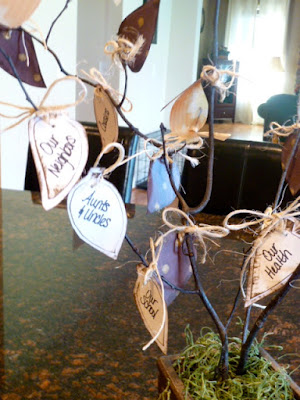
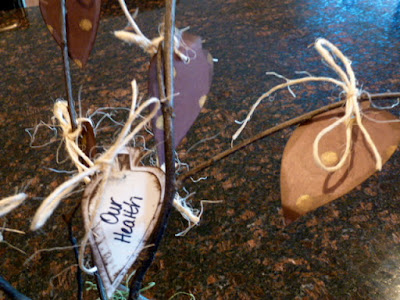
First I cut out leaves onto off-white card stock.  Then I glued those onto colored scrapbook paper.  Then I cut out these leaves a little larger by hand.  I end up with this.  (The vellum leaves are for fun.)

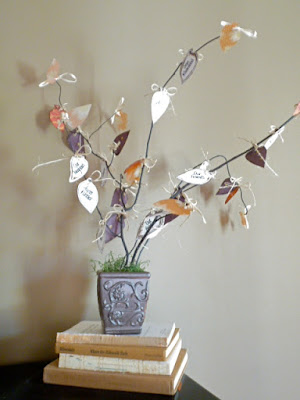
I had found a few sticks in my yard (this was easy considering we just had about 12 trees removed and there's lots of little debris.)  Instead of leaving them "as is", I spray painted them with Oil Rubbed Bronze to give an autumn-sparkly flair.

I used the Distress Ink to rough up the edges of the leaves a bit and then popped holes into the ends.  I then came up with all things we're thankful for.  I had to stop at 24 though... no more room on the tree!

Each leaf is tied to a branch.

I put the branches into foam in a planter I had sitting around.


Now it sits on our island as a daily reminder of all the things we are blessed with in our lives.