Tuesday, August 30, 2011

Back to School

I haven't been able to do a lot of crafting this last week.  Thanks to Irene, I was able to hang, tag and sort all 200 items for the consignment sale next month.  Whew!  That's always a pain.  Now I just have 8 Rubbermaid containers stacked in my room.  Blech... at least that'll go away soon... hopefully in return, I'll get a nice fat check.

Anyone out there consign their clothes?  If I get freebies from friends and/or Freecycle, those clothes usually head back out Freecycle style.  (Anyone out there Freecycle?  It's wonderful!)  For the rest of the clothes, yard sales just don't bring in the bucks... eBay worked for me for quite awhile, but the hassle of listing and mailing out 200+ items didn't sound appealing.  Not to mention, if something has a tiny little mark that I missed, I won't get negative feedback from a consignment sale.  They picked it off the rack themselves.  (But I'm only talking about things I miss... I am good... not trying to pass off messy clothes at a sale.  Ever go to one of those and think, "What were they thinking trying to sell that?") LOL

Yep, Irene hit, but we're about 2 hours inland, so it was mild.  Just lots of wind and rain.  Despite living in the woods, only one small tree cracked... and I think that one was slated for removal anyway (it's dying).  We have friends and family still without power though. 

What a week... earthquake hit about 2 hours south of us on Tuesday (again, no damage... but what a ride!)  Then the hurricane.  What's next?  

Wait...
don't answer that.

My crew, all ready for the first day of school... first "First Day" in the new house!


This week is the first week of school around here.  It's funny.  I read on Facebook all of these statuses of moms crying and sad as they watch their kids get on the bus.  

Um... maybe I'm a bad mom.

I was REJOICING!!  How does that commercial go?
  "It's the MOST WONDERFUL TIME of the YEAR!"  
This year... ahem... my youngest goes to school ALL DAY LONG!  Yes, all four are gone all day!  Woot woot!  As soon as that last one got on the bus, I headed to Home Goods (oh, how I love that store!) for some Mommy-Alone-Time.
Three off to elementary school.

...okay... I will admit that it's not all fun and games with the start of school.  First of all, that means that I have to go back to work (next week).  So, two days a week, I'll be busy again (but then again, the paychecks will start flowing again.)  Plus this year will be fun... I already know more than half the parents of kids in my class.  I guess that happens when you stick around as a teacher long enough, huh?

Also, the new start of the year means... schedules.  No more waking-when-you-feel-like-it; no more vegging-all-day-at-home-in-my-PJs, no more easy evenings.  Yep, with AWANAS, Soccer, and ESOL, our weeknights are getting busy.  And this body hasn't had to use an alarm clock in a few months (yawn).

Oh well, everything has pros and cons.  But, I know this... these kids NEEDED to get back to a routine, and I'm happy to oblige.  :)

Four monkeys on our last day of summer vacation... just before bed.


My friends on Facebook laughed.  We did a "Parents' First Day" photo:  
Such happy parents.  :)


Sunday, August 21, 2011

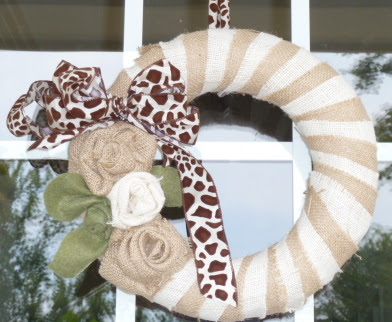
A Striped Burlap Wreath


Finally, something on the door again....

I was tired of looking at the bare door.  We had a few holiday wreaths this spring.  Then the Command hook fell off at some point.  So, it's been empty for awhile.

This week my back has been hurting.  Despite yesterday being almost unbearable, I managed to get up and moving a little today.  Instead of heavy lifting (which is what I need to do!), I thought I'd sit and make a wreath.

I found a straw wreath form, some extra tan and white burlap, some green felt, a few greenery pins, and some ribbon.

I cut the burlap into strips... just eyeballed it... maybe about 1.5-2" wide.  The more non-precise the better.  Looks more frayed and natural.  I started the wrapping by secure the strips with a greenery pin (on the inside of the circle... the backs of my wreaths show through the glass door, so the back needs to remain pretty.)

I began wrapping two strips at the same time, pulling tight to keep it from looking too loose.

As the strips would end, I just put pins wherever they ended.  I just made sure the pin was middle of the strip so that the next wrapping would cover it.

Once the wreath-wrapping was completed, I then made a few little burlap roses and a green felt flower.  

I added felt leaves and attach with some pinches to them.

Then a pretty animal print ribbon bow... and wah-lah...


A snazzy little wreath to dress up the door for awhile.  This should carry me till fall, right?

I'm linking up here:


Saturday, August 20, 2011

Drawer Labels

Well, I pulled out the Cricut the other day... and did a WHOLE lotta cuttin'.  


When you have a lot of utensils (uh, Pampered Chef anyone?  I'm addicted!) and wide drawers, it's tough to remember where to find things... like where the can opener is?  Where should I put the ice cream scooper?  So... I fixed it.  No more, "Mom, where is the ...."  Well, at least not in regards to the two utensil drawers.


Rather than label my drawers with boring white address labels or such, I did this:


Cutters, openers, BBQ

Miscellaneous gadgets, scoopers, spatulas, and tongs.

No more guessing.  If it's not there, it must be dirty!

Friday, August 19, 2011

New Curtains

I am impatient.

Ask anyone who knows me.  

My husband jokes about the time I was a substitute teacher, before kids... when we lived in our first real home.
When I called him at work and calmly suggested that we paint a room a certain color, you could bet money that I already painted it THAT morning.  ;)  I'd wake up, look at a room, decide on a color, run to the store, and paint it before he came home.  :)

When an idea pops in my mind, I want it to come true immediately.  I'm SO impatient.

So, after looking at our family room day-in and day-out...
I can picture so many changes in here.  Well, for one, the coffee table was changed to a black square one.  I want to change the sofas, replace the lampshades, add another fluffy new rug (if and when dear ol' Lucy becomes fully house trained), and... add curtains.

Originally, I wanted crisp, clean... simple.  In fact, I convinced Mike of this too.  So, when I changed my mind and insisted on curtains, he wasn't on board.

So, I researched.  Looked all over the web.  Facebook-ed friends to see what size to buy, where to hang.  Requested fabric swatches.  Hinted.  Hinted.  Hinted.

And finally, I convinced him enough to take the plunge, with the agreement that we can return them.

 These are the Delancey Contemporary grommet curtains from Curtainworks.com.  I got several swatches first to check out different curtains... all ivory.  Our first preference was a different textured curtain, but the grommets were a bronze color.  With all of our main-floor curtain rods being silver, I wanted to stick with that.  These have a chrome-color grommet.  I think I spent under $230 for all eight 108" curtains.  Then I got the rods at Target... cheapest place I found.

Here it is now...


I love how they cozy-up the room a bit, don't you?

Now... the sofas are going to be a tougher sell.  Just a tad pricier.... eek!

Friday, August 5, 2011

The Last Kid's Bedroom

Well, after painting a guest room and three siblings' bedrooms, it was time to finally hit the walls of our oldest son.  He's 12 now, so we needed to aim for a "big kid/teen" style.  No Star Wars stickers here.

His room originally looked like this:
 Okay, it did not look THIS crazy on a normal basis.  I was already partially moving things when it dawned on me that I hadn't taken a "before photo".  Oops!  


Notice the bedspread?  A very boyish skate/ski sort of theme to it in blues and browns.  We went with that for the paint colors, since most of his room is blue and brown anyway.  I'm so psyched about the colors we chose.  I could've gone with gray instead of tan, but wanted a little brighter color in there.  We went with a yellowy-tan instead.

Here's where we ended up:
I painted the closet area with the dark blue.   This bedroom is the only one without a walk-in, but as you can see, it's a nice size closet.  By just painting this corner, we gave the room a little pop without going overboard.  (Whoops... do you see the ladder peeking from the bathroom in the background there?)

Here's the reading nook.  I think that Papasan chair was his Daddy's when he was in high school.  The cover was a mashed-up job I did with a needle and thread and cheap fabric... but it's lasted almost 10 years!  The base was also broken and fixed by PapPap.  It's been through a lot, but is still super comfy!

Here's where the two colors meet.  (The door on the left leads to the hallway.)

Here's the dresser area.  This is a "to do"area still.  Notice one of the handles has fallen off.  I'd like to paint these dressers a dark brown to match the bookshelf shown above.  The shelves, I thought, were an amazing score when I found them at a thrift store for $3 apiece... till I got home and realized they required some obscure brackets to make them look "floating".  Well, I fixed that and bought simple plain brackets from Home Depot and just screwed them to the bottom.    

See the blue in the wall, the blue shades (yes, they are true navy blue, similar to the wall... bad lighting) and the blue in the bedspread?

How cool that I was able to convince my son to get "Starry Night" as a poster for the bedroom instead of  some silly characters or movie?  I guess he's actually growing up!  I love how those colors pop in this room, too.

Still into Lego's, but growing up... Lego Architecture.  Who doesn't LOVE Fallingwater?  The Medieval Village is on top of the bookcase... forgot to photograph that.  The other doo-dads here are from Nana and PapPap's trip to Turkey (horn) and our trip to Mexico (snake).

Here's the desk area.  It was a hand-me-down from some all-grown-up cousins. (Note that even boys can use Thirty-One... both black bags are 31 and are holding Pokemon cards and cool collectibles... the Zipper Pouch is holding school supplies.)

This cool table lamp was a clearance find at Target... love the dark brown "woodtone".

After painting a bathroom this week, too, my body is feeling it!  Whew!  Forget working out... just paint!

One downfall to being so short is having more steps to climb on a ladder EVERY time you want to paint.  Blech.  I'm off now to put my feet up and nosh on some bon-bons.  (Yeah... right... got some bags to pack and a dinner to make....sigh.)

Wednesday, August 3, 2011

Hall Bathroom Painting

I'm back on the paint wagon... yay!  I've been hesitating since I just KNOW the builders will be through on their 9 month check to fix nail-pops and settling issues.  And I KNOW they'll put big globs of spackling all over my painted walls... and I KNOW they won't spot-fix the painting with my paint... they'll use the builder's paint (white).  I KNOW this because it happened to my neighbor who painted all of her rooms in the first few months.  She had white patches of wall all over her pretty red, green and yellow walls.  :(  What a pain to fix those....

However... the white walls are driving me insane!!!  So... I paint.

Funny how things work.  One of the first cans of paint I purchased for this house was for the upstairs hallway bath.  95% of the time, it's used by my youngest daughter.  The other 5% of the time, she needs to share it with guests.  Plus, it's the room you see first as you walk up the stairs.  

Soooo.... no pink and purple and princess crowns and rubber duckies.  Well, I could've done that.  But this "diva" prefers red to pink, likes Webkinz over princesses and is way too "old" for rubber duckies.  

Funny how things work.  I wanted to get the guest areas working first.  We had a lot of visitors the first couple of months, coming to see the new digs and coming to help with the kiddos while we moved in.  It didn't take too long to get the guest room ready:

Wasn't sure what to do with the guest bath, though.

And one day, I was browsing around Home Goods when I found a beautiful April Cornell shower curtain. 
 It blended colors I wouldn't have naturally chosen:  sage, yellow and lavender.  So, I went with that... bought matching bathmats and towels.  Then found a few accessories from Goodwill and various thrift stores and figured that's all that was necessary at first.  Within a few days, I found a lovely paint shade to go with it all and bought it.

And that paint can sat.

And sat.

And sat.

I don't know... there's just something about painting around the toilet pipes and shower faucets that makes me cringe thinking about painting a bathroom.
This week, I finally did it.  Funny thing too... it only took me about 4 hours start to finish with many breaks.

Here's the final product:
The color is from the Martha Stewart line at Home Depot.  I had it colormatched to Behr Premium Plus.  Unfortunately I lost the original swatch.  I think the MS color is called "Shortbread".  

Originally on this wall, I had two of those woodchip rose wreaths stacked using Command hooks.  Really classy, I know...  but last October, I had a serious fear of putting holes in my brand new walls!  (BTW, I found these wreaths at Target on clearance for under $3 each).

 The intent was to see if that's what I liked.  I did like that stacking one over the other, but after the paint went up, those wreaths just blended into the paint color. 

So, I went scrounging around my junk pile in the basement.  (See... I KNEW there was a reason why I kept so many things.)  I found this cabinet door.  It's a simple beadboard door that was a sample at one point.  It evens has the information on the type of glaze/stain, etc. on the back:
I hammered some ribbon to it with tacks (bought at Joann's for $1/roll), put a little nail in the front to hold the woodchip rose wreath.  And wah-lah... instant bathroom decor for $7 total.  I told Mike I should've skipped the ribbon, added a door knob and seen how many times people would've attempted to OPEN the door.  LOL

 Here is the little toilet area.  
WHY do they do this???  The towel rack is a standard builder's grade blah-rack (someday when I have extra $$ sitting around, I'll replace it.... i.e. probably never).  But it's at least nicely centered on the wall there between the shower and the closet wall... but the toilet isn't!  Why???  Now I feel like I need to go buy a cute basket or something to fill that space and even things out. 

(Have I ever mentioned my OCD/Math-minded quirk?  I like SYMMETRY!)

 These little do-dads were thrift store finds.  I bought them to "stage" my last house and planned to just sell them in a yard sale.  Ha... they matched!  See that little green vase?  My intent was for guests to use it for toothbrushes, but I guess it's never been obvious.  No one ever has.  I even scrubbed the inside well.  

I suppose I'll have to Cricut some letters to label it next.

Love the double sink area in this bathroom.  My daughter likes to brag that she has TWO sinks and everyone else only gets one.  That would be something to brag about if I could get her to remember to USE them!! (But that's another story....)

The problem with putting a counter from wall to wall though is the lack of room for a hand towel.  I did put a little hook near the shower, but it's for my daughter's towel.  So... I bought one of these little doo-hickies at HomeGoods.
I love these... they remind me of a fancy-shmancy hotel or B&B or something.  The problem is that they are NOT made for regular sized handtowels.  And just how often do you see "fingertip towels" on special to match your others? Uh... hardly.

So, here's how I fix that....  hey, it works.  :)


Well, it's nothing fussy... nothing that makes you go "Wow!  I wish I did that."... but at least it's a finished room and I wanted to share how I can complete a room.  :)  (By the way, I do have bathmats, but they are in the dryer...imagine sage green soft mats on the floor...LOL.)