Monday, September 12, 2011

Pedestal Bowl

A few months ago, I found a big decorative candlestick for $1 at a local consignment sale.  It was nice, but it was for a taper (which I don't prefer) and it had a screw sticking out of the top that didn't want to budge.

So, after finally unpacking some old boxes, I found the perfect "topper"... a small red bamboo bowl I had bought when "staging" my home.

Put the two together (easy... it just screwed on with some pressure... and added a little glue for support)... spray painted them with Oil Rubbed Bronze.... and ....

Wah Lah...


Inside is a nice little resin pumpkin I picked up at Michaels...perfect for fall.  (The fabric peeking out are some fall napkins I had to help boost the pumpkin up.)


Thursday, September 8, 2011

News of the Day

We made the local newspaper.  

A friend of mine interviewed me on the process of building a new house, and we were in the local Homes section of the paper.
I didn't tell the kids much about it, so they were surprised when I showed them the layout of the newspaper.  "That's our house!"  And, yes, my sweet little Westie made the paper... sleeping on her half-chair/Doggie-Throne.  :)

It doesn't take much to impress me.  

This was cool.
:)

Thanks, Susan!

Wednesday, September 7, 2011

I {heart} Dollar Tree

It only took a year.

Our unfinished basement has been our catch-all spot for boxes upon boxes upon boxes.

My hubby and I have finally gotten around to doing something about it.  We keep dreaming of finishing off the basement and having more useable space.  

THAT may not happen anytime soon, but at least we can get rid of the boxes. 

We succeeded!

The basement is now *mostly* free... free for me to use as a big ol' craft space!!!  YAY!

I promised to get the piles and piles of crafty goodness organized.  Remember we moved in last September, and have had no organization downstairs whatsoever... so my goodies were still in shopping bags, thrown into piles, and tangled up!  So we're slowly acquiring some nice wire shelves, but I wanted some way to sort the items.  I wanted it to look nice (and neat, orderly... you know, to satisfy the OCD).  I started cringing looking at bins and baskets.  I found a few neat storage items at Target today, but at $5-$20 a pop (and I need dozens), I just couldn't take that kind of plunge.

So, with just 30 minutes left to shop before having to head back to the home to grab the kiddos off the bus, I decided to take a quick detour... to Dollar Tree!

I was in organizing heaven!

Granted... the are mostly buckets, dish pans, planters, wastebaskets and laundry baskets, but I think they just may work... and the total for all of these things you see... $30... for 30 bins.  

Hmmm.... what magic can I whip up to make this look good?

Stay tuned.....


Monday, September 5, 2011

A Touch of Fall....

On Friday, I had a few free hours, so I decided it was as good of a time as any to get a little fall decorating done.  Here's a snippet of how fall entered our home....

All new goodies on my dinner table (perhaps not completely done)... the wagon was a Michael's find... it was the perfect shade of soft orange, the gourds and cattails were all Dollar Tree finds, and the raven was from Michael's.  I splurged on this guy... $4.99... only to find more later at Dollar Tree for a BUCK each.

My Fall Banner.  This was one of my first attempts at making something I found on a blog.  Don't ask me which one.  I'll never remember.  I bought felt (for the back of the triangles) and used clearanced kitchen towels to get the patterns for the inner triangles.  They are tied together using strips of kitchen towels.

My hearth... do you see the second raven hanging out in the middle of the fall flowers?

I love this guy!  I found him at Home Goods and really splurged on him ($12.99), but I loved the fact that he was all sparkly and a great size.  

Raven #3... this little setting is in my living room on the media cabinet... much too high for the stinker puppy to grab and chew.  Gotta watch her... she's already eaten a few of my decorations...


Just some more fall touches.  I made this arrangement pumpkin a few years ago.  I covered a faux pumpkin with sprinkles and then cut a hole big enough to shove a bunch of fall faux foliage.


My feather wreath!  I've been wanting to get one, but wasn't sure the feathers wouldn't be a bit too much.  Fortunately getting this "bronze" colored one, it has just a touch of creepy to it.  Great for Halloween... though I'm hoping it can remain till at least Thanksgiving.  On sale at Joann's this weekend.

A little update to my books/pear... gourds!

Scarecrow... who can't adore a little scarecrow.  :)


When you pay just $1 for a few pretty fall-colored flowers, you make it work.  Here, I put them inside the faux grass.

Cabinet Door Office Boards

Months ago, I bought two identical cabinet doors at the Restore for $3 each.  I knew I wanted to use them in the office somehow to keep things nice and symmetrical.  I needed a place to hang important notes, business cards, invitations, whatnot.  But a big board wasn't my choice.  This nook's wall is quite visible to the kitchen and living area... I wanted something a little neater.

I got this.

First I primed and spray painted both cabinets with Heirloom White spray paint.

Then with cabinet door #1, I cut a piece of adhesive cork to fit inside the middle area.

The second cabinet was done with a piece of cut galvanized steel.  I cut it to size with regular scissors (couldn't find the tin snips).  Oh, I probably dulled the blades, but it went quickly and easily... less than 2 minutes.  I spray painted the metal with Heirloom White, then used spray adhesive to lay white burlap on it.  I wrapped and trimmed the edges, and using hot glue, I pressed the covered metal onto the cabinet.
Now, it's a magnetic board!  I found some old pebbles and used strong glue to hold them onto the magnets.

The office is now complete.  New boards....


And now my office is neat and ready for business school.  


Sunday, September 4, 2011

New Calendars

I have a serious problem with calendars.  

Nothing really works for me. 

I try new planners every year. 

(Small ones... are you kidding?  Four kids.  'Nuff said.  Big ones... too tough to carry around.  Stickers... really?  I don't have time to pretty-up my own planner with stickers.  Daily/Weekly pages... I need to see a month on the calendar at once.)
I found a simple one this year... let's hope it works. 

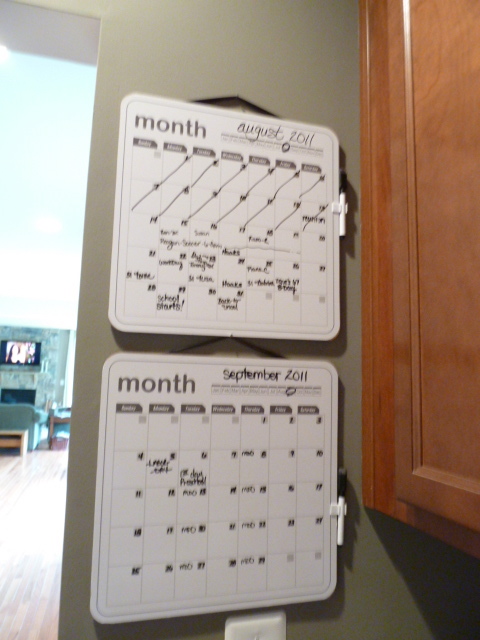
As for the family wall calendar, I've tried big paper calendars, small calendars, dry-erase calendars, chalkboard calendars... nothing seemed "right".  Paper calendars aren't attractive and get all wrinkly by the end of the twelve months... not to mention ink is permanent if you have to change things.  Chalkboards produce too much dust (and to be honest, it's a pain to keep them looking nice and fresh).  My only gripe with dry-erase is the fact that it only covers one month and then you need to erase the whole thing and start over with every new month.  I've seen some people make some really cute ones with glass inserts in frames.  Very simple and it can be tailored.  However, I needed a certain size and limited budget.  I was fretting over making a new calendar...

until....

The Target Dollar Section saves the day again!
These dry erase boards were $2.50 each.  I bought two... one for the current month, and one for the following month.

I simply added black ribbon and stapled it to the boards.  The tape is simply covering the staples to avoid scratching the wall.

Know these?  Little sticky plastic bubbles?  I used these on the bottom to help keep the calendars still (friction) and to avoid them "clanging" as people walked past and moved the air.

And here's our new calendar wall.  Love it!  Another cool plus to using the ribbon and nails... as each month fades away, I trade calendars and replace last month's calendar with the next month.  And it's subtle, and hidden from most traffic.


Friday, September 2, 2011

Office Cabinet Reorganization

School has begun!
(Do you hear the cheering?)

Just before school started, hubby and I decided we really needed to get some things organized here at home.  Our home office is a little nook in the corner of our kitchen and it's kind of Grand Central Station... everyone moves through there everyday.  Papers are piled all over:  bills, coupons, important papers, kids' schoolwork and teachers' papers, etc.

If I didn't get this ready by the first day of school, I knew we were in for trouble.  (Have you ever seen the pile of paperwork that comes home on day one?  Geesh... multiply that by four, and you can practically swim in it.

Here's the cabinet over the computer last month:

I adjusted the shelves when I unpacked last year to make the bottom ones tall enough to hold books and files.  Then I unpacked all papers/binders and just piled them in.  The wooden file case on the bottom left held all important school papers that came home:  teachers' notes, PTA papers, tests/projects I wanted to keep.  

Do you see the problem?

The file barely fit in there... I had to remove the entire box to file papers (and I hate to file!)


Here's a shot, mid-organization.  The paper sorter boxes on the left are from Target.  The magazine files on the right were a buck in the Target dollar section.


Here's the left cabinet now:

The paper files are labeled to hold all kids' papers (look how many are in there ALREADY... only one week of school... geesh).  Semesterly, I'll sort through them and put the kids' papers into their "save box".  I made the tags with index cards, Cricut letters and my new LAMINATOR.  Yes, it was well worth the whopping $18 purchase at Amazon.


Here are a few standards for us:  coupon drawer holds coupons till I can sort them into the coupon binder;  change is just that... money from emptying our pockets and/or bottom of the purse :) ;  bandaids, which I thank my friend Kathleen for that idea.  How often does a child run inside with a scraped knee.  Now with Neosporin and bandages in the kitchen, it's easy to clean up instead of running up to the bathrooms.  The coupon binder is for carrying to stores.  The Box Tops box came from Target as well (dollar section!)  

And here's the right cabinet:
The top two shelves are paper sorters that hold some important binders (VBS, important numbers/papers of the family, etc.)  The third shelf down holds $1 buckets filled with kids' supplies like crayons, gluesticks, markers, etc.  With the large island, where much homework takes place, I always need these school supplies.  

The magazine files from Target on the bottom hold things like manuals, directories (can't believe how many we have:  church; old church; elementary school;  old school; each class; Bible study group; etc.), magazines, and more.  I debated turning them the other way to make it look neater, but decided I'm too lazy.  This way, I can grab the item I need if it's visible without pulling out the entire file box. I also added a little dry-erase board for any notes I need to remind myself of (why not?  It was a buck in the dollar section, too!)


The magazine files.

The buckets (sorry, had to use flash... need more lighting in this room)

In the next couple of posts, I'll show you a few other additions to the office.  :)


We are SET for school!
Bring it on!